Why is Five Guys one of the best photo shoot locations in London?
Unique neon lighting, authentic American Diner experience, and they have dozens of locations.
Read MoreWhy is Five Guys one of the best photo shoot locations in London?
Unique neon lighting, authentic American Diner experience, and they have dozens of locations.
Read More
South Foreland Lighthouse
I’ve seen plenty of photos on my Instagram feed from this film. What attracted me to try this film out were the surreal colours that it can produce. Phenomenal photographers like Hayden Williams also shoot on this film, his digital work is very similar to what this film can produce. In short, if you ever wanted to shoot like Hayden Williams for a day - try this film.
The first time I shot this film was in Dover. The white cliffs is the ideal place to give this film a test run. The vast fields of greens and browns, the beautiful white cliffs, and the deep blue ocean gives this film plenty of room to play around.

The White Cliffs of Dover
Shooting the Film
The Lomochrome Purple from Lomography is a unique film, not only in the way it processes real life colours but the dynamic range at which it can be shot at. The film is rated at 100 - 400 speed, so it can be shot at either ISO 100 - 400 depending on your preference and the lighting conditions. To decide on what film speed to shoot at, I spoke with Lomography on Instagram, and they recommended shooting at ISO 400 for softer colours.


What I discovered while shooting this film
The scans I received from the lab came out a little bit too purple for my liking. Before shooting this film, I had in my mind the photos would be a mixture of cyan and pinkish tones. The scans I received were mostly purple (hence the name) and darker blue tones. After tweaking the colours a bit to my liking - to make the purple more of a pink - I finally got it to the tones I had in mind.
I initially thought it might be wrong shooting an iconic landscape for its green fields and white chalk on this film. Would the Cliffs lose its charm if it were seen in different colours?
No. I think in a way this film creates an alternate universe, or a wonderland. It transforms a scene that would’ve been photographed hundreds of times a day into something that is beautiful and just a step out of reality.

This new series is a throwback to my previous shoots. I'll be explaining what the shoot was for, how I shot it and edited it. This shoot was with Sophie way back in late 2016. I thought it would appropriate to kick off the series with this shoot, because Sophie is a model I shoot with a lot, and this shoot was actually for Lomography.
This shoot has a mixture of shots I took with Lomography's Daguerreotype Achromat 2.9/64 Art Lens, and my normal gear. The lens had metal aperture blades which you needed to physically change to adjust your aperture. I loved the unique softness the lens had, but there was an issue. I didn't realise the lens was broken, or on its way to breaking. The lens barrel came loose and kept shifting forwards and backwards, which led to the lens not focussing at the distances it's supposed to. This led to it come apart as I was shooting with Sophie later on in the evening, and me having to go to Lomography - basically saying, "Help! I broke the thing you sent me to test, and I don't know how I did it!".
I did manage to get some shots that they were able to use, although I didn't realise I was shooting with the lens at 60% of its actual capability.
With the editing, I don't have the Photoshop files on me at the moment to show you screenshots of what I've done. In the 2016 period, I was retouching skin with the frequency separation technique. To edit colours and tones I would be using a mixture of curves, and a solid colour layer. I'd usually add a warmish skin tone solid colour layer at 15-20%, with soft light blend mode.
I just want to say again, I am so so so sorry Lomography! It was an accident, and I probably should've messaged you guys as soon as it became slightly loose!
Here's a link to the web post and interview: link.
Let me know in the comments which shoot I should review next, you can find them at @kipkat or @kipkat2 on Instagram.


Lotta-Liina
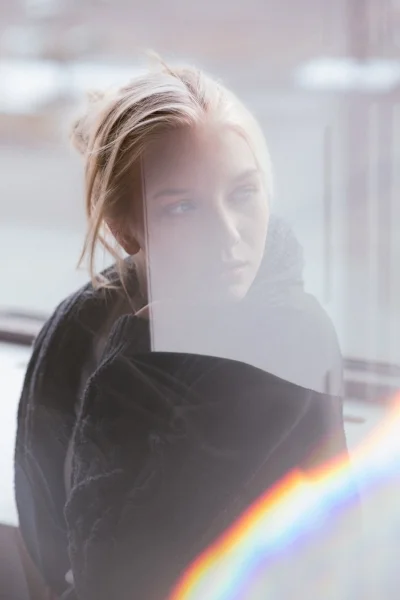
There's something about imperfections that makes a photo really interesting. Imperfections in a photo such as obscuring a part of the lens, lens flares, or light rays can make a photo more visually interesting. They could change the mood of a photo, making the scene more angelic, or even retro through the use of lens flaring or rainbow effect. One way to introduce these photo imperfections is through the use of a glass prism. The glass prism can have several effects, depending on how you're holding it to the lens. You can use it to split white light into a rainbow of colours. The prism, can be used as a sort of mirror to reflect other parts of the scene into the frame. Finally, it can be used like any sort of glass - to obscure the lens and add a nice soft blur.
Here's a link to the Glass Prism I use on my photo shoots.
Below are some examples of ways I've used a glass prism in my photography.

Mari

Emma
Tyra
Don't just stop at glass prisms, you can take it further by obscuring the lens with other items. Whether it be a piece of acrylic, metal, cloth, or even your finger - there are so many different effects you can create. Experiment yourself and find out what technique or material compliments your style of photography best.

Polaroids are the coolest, hippest thing at the moment, right?
Instant cameras were designed to capture the most memorable moments and to produce a photograph instantly to share with your friends or family. From the original Polaroid Land series to the modern Fuji Instax series, the same principle still stands, although the price tag might be different.
The biggest change in the Instant Photography industry occurred when Polaroid filed for bankruptcy in 2008 and discontinued its production of instant cameras and film. Polaroid shut down its factories around the world, and the original Polaroid film formula was lost.
In an attempt to recreate the Polaroid formula, The Impossible Project (now Polaroid Originals) launched a Kickstarter campaign in 2011 - to fund their research and development of the original Polaroid SX-70 and SX-600 film, and to purchase an old Polaroid factory. They have yet to perfect the film, but it’s pretty much 80% near perfect at the moment - some may argue differently.
You’re probably thinking, why not pick up an original Polaroid fold camera like the SX-70 or the SX-600 and use this new near perfect Polaroid Original's film? Well, the price of film from Polaroid Originals is considerably more expensive than to Polaroid’s original film. The price of one pack of Polaroid Originals film is around £17.00 for 8 shots, whereas the original Polaroid film contained 10 shots and was much cheaper. The increase in price is due to The Impossible Project only having one factory which is producing the chemicals, the negatives, etc - whereas Polaroid had numerous factories around the world, each with a specific production purpose.
That’s enough about the history and the pricing of the film.

Polaroid Originals offers a wide range of film skins and accessories which Polaroid did not originally offer. Polaroid Originals offers skins such as; circular frames, animal prints, colour frames, floral frames ( Frangipani, and Fuschia), and even a bird frames. You can also pick up a wide range of accessories for your Polaroid cameras such as a flash bar with colour gels, and a set of lenses - that contains a wide range of lenses from fish eye, close up, ND, etc.
Although Polaroid Original's formula is nearly perfect, it takes up to 30 minutes to develop, and the results from each batch still varies. Bare this in mind, the results won’t be picture/colour perfect photos, but photos with a slight blue-ish or yellow-ish tone, sometimes with undeveloped streaks. It will take a few packs of film for you to get used to producing consistent results.
Is the wide range of accessories and film available worth the up-marketed price of an almost perfect film?

Fujifilm has released their own version of instant cameras and film. They have a wide range of camera and film available that rivals Polaroid Original’s line up. Currently there’s the Fujifilm Instax Mini 8 (a basic instant camera), the Fujifilm Instax Mini 90 (similar to the Mini 8 but with more functions such as; a double exposure mode, macro mode, a self timer, and the ability to turn off flash which the Mini 8 lacked), and the Fujifilm Instax Wide 300 (a much larger camera that shoots wide film).
Fuji’s film formula is perfect, it captures colours and tones truly as seen. The film is considerably inexpensive compared to The Polaroid Original's - the cheapest I found the Fuji Instax Mini film was £13 for 20 shots on Amazon. There’s a wide range of film skins available like; Candy Pop, Comic, Dalmatian, Rainbow, Shiny Star, Stained Glass, and Wedding.
The main downside I’ve come across with Fuji’s Instax is the size of the film, they’re very small - sort of like a business card size. They’re great if it’s for something personal, but for a professional project, the quality isn’t there.

Lomography’s answer to the Fujifilm Instax is… an instant camera which also uses Fujifilm’s Instax film. To be fair, the Lomo’Instant does have new features over the Fujifilm Instax series, the ability to attach accessories such as flash gels, or to mount several lenses like; a wide angle lens (which is built in), a portrait lens, a close up lens and a fisheye lens. The Lomo’Instant also has multiple shooting modes, the ability to control flash, long exposure mode, and a ‘creative mode’.
Lomo’Instant could be considered an upgrade from the Fujifilm Instax series with the ability to mount different lenses and attach flash gels. The only problem I’ve had with it, is the bulkiness. It’s a slightly weird shape and a bit too big for me to carry around or even bring to a party.
Sadly, the cost of one of these cameras is around £119 (Inc lens set, because without it - you might as well get an Instax) or even more for a different camera skin.

Polaroid (yes, the actual company Polaroid) announced their new Polaroid Snap instant camera. The difference between the Polaroid Snap camera compared to Fujifilm’s and the old Polaroid cameras, is the Zero Ink printing technology. Fujifilm and Polaroid Originals films uses chemicals in their film which raises the cost the film, but the Zero Ink paper is much more inexpensive in comparison.
The quality of the images produced through the Zero Ink printing technology is a lot higher than Fujifilm’s Instax, and Polaroid Originals film (arguably, because different batches of film produce different results).
However - there’s always a however, you have to be expecting it by now - there’s no traditional white border around the photos. How will people differentiate it as a Polaroid instead of a really small high quality print? The inner hipster inside of me is going batshit crazy. Would the high quality make up for the lack of nostalgia of having an authentic Polaroid picture? - I use the term nostalgia very loosely here, as I was born in ‘95 and I can’t really say I grew up with Polaroid.

A fraction from my wall of Polaroids
This is where writers usually give a very anti-climatic answer to what product you should get. They’re all good instant cameras, built for different purposes, with different results. I will give some useful advice (for once in this article…).
If you’re planning to get a camera to shoot Fujifilm Instax film, get the Fujifilm Instax Mini 90. I’m going with the Instax Mini 90 because I have the camera and I’m biased. The Mini 90 is very rugged, I’ve dropped mine from head height 4 or 5 times, and it still works fine. It has many more functions and modes that the Mini 8 does not have. It’s cheaper (even when bought with film), and it isn’t as bulky as the Lomo’Instant.
If you’re set on using Polaroid Original's film because you obviously go on holiday in St. Barts, drink Grey Goose as casually as I drink tap water, and can afford £16 for 8 shots, get the Polaroid SX-600. Why? The camera is so so so much cheaper than the SX-70 even when you purchase a refurbished version. I bought the SX-70 for around £260, whereas the SX-600 is around £90. The film speed of the SX-600 is around ISO 600, and the film speed for the SX-70 is ISO 100 - which limits where you can shoot with the SX-70. Trust me, it will be impossible (pun intended) to photograph your hip roof garden parties with just the SX-70 on its own.
Also, there’s so much more variety of film available for it. With a larger variety of skins (a previous one being a black and yellow film collab with Third Man Records), and a larger variety of cameras available (seriously, there’s so many types of SX-600 cameras, even a Barbie one!).
If you have any questions, leave a comment below. Also, let me know your thoughts and experiences with these cameras.
This post is from the archives of Eight Magazine